The Definitive Guide to DIY Poly Tube Solar Pool or Spa Heaters - by a Thermodynamics Expert
Article posted by Gregory Grochola (physicist) on 16th Feb 2019
So irrigation poly tube or black hose as a solar pool heater, we've all seen the YouTube clips - and laughed heartily... but on closer inspection, there might actually be something in this. If you're hell bent on your poly pipe solar pool heating system and nothing is going to stop you, then this article is for you. We'll go through all the basics and bust the myths so you don't end up wasting your time and money and might end up with a semi-decent system with every aspect optimised to the last percentage point. We'll be covering the following:
- How do poly pipe tubes compare to commercially available collectors - which diameter to use
- To space the pipes or not - what's the optimal spacing
- Sizing the system right - how much area to use
- What installation tilt angle and array plumbing is best?
- What size pump and plumbing setup to use for the best efficiency
- What about a solar PV type controller system
- Why you need a vacuum release - important!
- How to overcome and check for airlock issues
- What system components to use - which materials withstand chlorinated water
- Common myths and misconceptions
1. How Do Poly Tubes Compare to Commercially Available Collectors
Poly Tube Costs & Efficiencies vs Commercial Systems
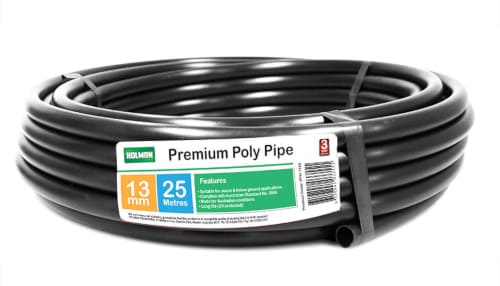
So as a first step lets approximate the efficiency of a poly tube system and compare it to proper pool heating systems. Now you want to use LDPE poly pipe, not HDPE, as it's cheaper and thinner, (hence more efficient) but still has good chemical resistance and should last a long while, we'd recommend the Holman's brand as it's commonly available from Bunnings and seems to be the cheapest yet good quality with a smooth inner wall. There are three sizes: 13mm, 19mm and 25mm.
So the efficiency of an unglazed (no glass cover) thermal collector to a good first approximation is going to be proportional to the aperture area + a fractional scattering component from the sunlight that falls in between the tubes. The aperture is basically the black pipe area, which for a 13mm x 50m length of tube = 0.013m x 50m = 0.65m².
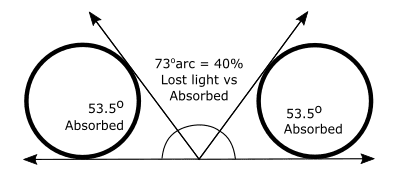
The fractional scattering component is the amount of light that is hitting the space in between the pipes and is being scattered back onto the pipe. When pipes are spaced about one pipe diameter apart (let's define this as Loosely Spaced from now on) about 60% of this light is being collected, 40% is lost, as a first guess. Tight packed is when pipes are touching each other. A tight packed design has the greatest efficiency per gross area (total area taken up by the collector). A loose spaced design may not have the greatest efficiency per gross area but will have the greatest efficiency per pipe aperture area (i.e. per pipe length). For loose spaced poly tube collectors we can define an effective aperture by adding the 60% scattering component so that the 0.65m² is now 1.6 x 0.65m² = 1.04m² (effective aperture).
Normalising a collector's performance like this means that 1m² of effective aperture for one type of collector or collector design will produce the same energy as 1m² of effective aperture for any other collector, even though the two collectors might have different gross areas and designs. Now we can find the cost per effective aperture for each collector design and do an apples to apples comparison on a cost basis. So with that in mind let's create a comparison table (prices were obtained from Bunnings, 2019).
Dollar Cost per Effective Aperture (proportional to efficiency)
So now we have a very interesting result and, in fact, a quite fortuitousness result - in that the poly tube diameter we'd recommend, the 13mm (due to airlock clearance, something we'll get to below) - is actually very close to the lowest cost per effective aperture. At $20 per m2 (effective aperture) for a loose packed design vs $40 or $131 for premium OKU panels, that's not too shabby at all, so far so good.
2. To Space the Poly Pipes or Not - What's the Optimal Spacing
Loose Packed vs Tight Packed
So we already spoke about this, but we thought we might highlight the differences. The choice of design you go with is going to dependent really on the amount of area you have available to mount on. Loose packed coils will take twice the area of tight packed coils. Tight packed coils are more efficient per m² meter of collector but if you have the room, loose spaced coils will provide more bang for your buck/dollar - collecting approx 60%* more energy per meter length of poly piping, hope that makes sense. We'll leave it to you to decide which is optimal for your setup.
*Note, this 60% will depend on the surface pipes are installed on. If the surface is a dark AND conducting sink like say concrete for example then expect much less.
Total Poly Tube Area Your Collector Will Take Up
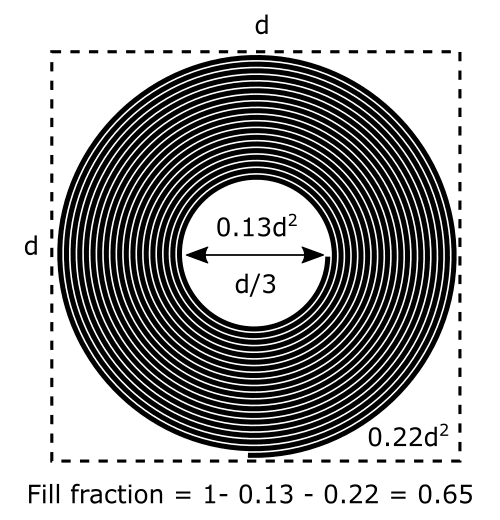
Now while we're on the subject of area, we need to show you the area you're going to be looking at - because ummm it's extensive with poly tubes. These systems will require much greater areas as compared to commercial systems. So firstly, let's work out the packing fraction of a tight packed hypothetical coil. The picture shown is the tightest of the tight pack configurations, and it still only fills about a 0.78 x L x W - 0.13 x L x W ~ 0.65 fraction of the square (we don't recommend very tight inner coils due to the possibility of kinks). So this only fills about 65% of the space of say a rectangular OKU panel. In other words the gross area of tight packed poly tubes will take up about 1/0.65 = 1.54 x the gross area of OKU panels, and since a loose spaced design takes 1.04/0.65 =1.6 x the area of a tight packed design to produce the same heat, a loose spaced design takes 1.54 x 1.6 = 2.5 x the square area of OKU panels to produce the same energy. Keep this in mind as even conventional pool collectors do tend to take a lot of space, for example in the pool heating industry 2/3rds (66.7%) OKU panel pool coverage (that is of the pool's surface water area) is a common sizing. If you wanted to do this with a loose spaced design you'd need an area 2.5 x .667 = 1.667 x the size of the pool's water area (or 167% coverage). However, you would get a decent 4°C-10°C temperature boost at this sizing, depending on wind exposure and/or if you use a pool cover. If you wanted that much heating with a tight packed design you'd need 100% coverage or 1 x your pools water area.
3. Sizing the System Right - How Much Area to Use

We've got some free sizing tools as sizing calculations can get complex, see here for the pool sizing calculator which provides a recommendation on the area of collector to use, and here for an actual pool simulator that will allow you to simulate pool water temperatures. Now there are no settings for a poly tube system but, you can just use the OKU panels setting and recommendations and then work backwards using the effective aperture ratios to get the size of the poly tube system you'll need.
For example, if you use the above calculators to work out that you really need a 10 OKU panel system, then you'll need a 10 x 1.1m² / 0.65m² = 17 tight packed poly 50m coils. If mounting a loose spaced poly coil you'll need 10 x 1.1m² / 1.04m² = only 10.4, 50m coils. BTW if you're building something in between a tight packed design and a loose spaced design just use an effective aperture in between 0.65m² and 1.04m².
Sizing the system right is one of the critical aspects of system design, you don't want to go to the trouble of setting up a system, plumbing everything in, buying pumps and controllers, then finding out it's only going to add a couple of degree of pool temperature.
4. What Installation Tilt Angle and Array Plumbing is Best
Installation Tilt Angle
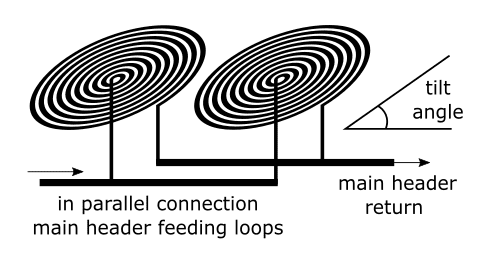
So you've sized your system professionally, and you've decided on pipe spacing to be compatible with the mounting area you have available, now let's look at the optimal tilt angle of the coils. In this regard I have some sad news because there is really only a small range of tilt angles you can use with poly loop coils and that's pretty much flat to shallow. Why? you may ask - well when you tilt a set of coils you are setting up loops of multiple airlocks, any pump will now have to overcome each and every loop of airlock to actually start moving water in the system. If you've got too many high tilt airlocks and hence too great a pump height you might not get any flow in loops, or you might find you can't evacuate the air pockets completely, although this is less likely for the 13mm diameter piping.
Keep the install angle shallow, may be no more than 10° tilt. That way you really only need a small pump and there is no chance that one of your loops will not get any flow through it. So now we come to the first reason for using 13mm and not say 25mm; it's much easier to clear air pockets which means pipes will be completely filled with water and will be running at maximum efficiency.
Array Plumbing Connections
We'd always recommend introducing water in-parallel into each coil, as opposed to in-series; that is going from one loop into the other. Introducing water in-parallel will make sure you keep the pressure down, as one issue that we can see straight off with these systems are leaking issues. LDPE poly pipe is rough on the inside and is not going to be easy to seal. Lowering pressure will go a long way to making sure you've got a leak free system. Leaking issues are non-issues for a ground-mounted system, on gravel or pavers for example, but far from fine on a roof where chlorinated water could corrode a roof.
5. What Size Pump and Plumbing Setup
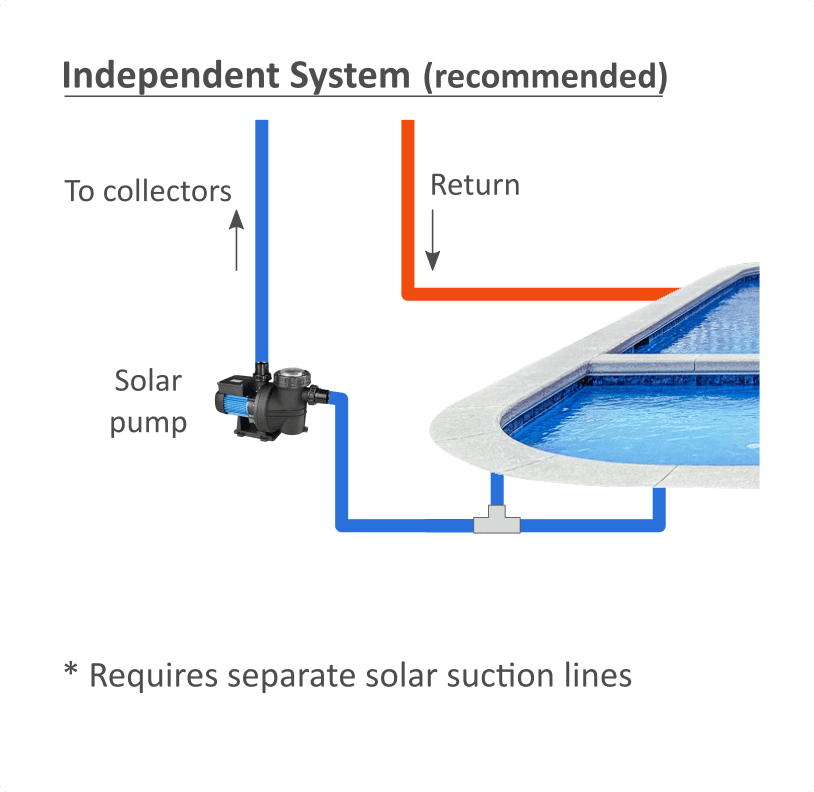
Which Plumbing Configuration
For pool heating systems there are different plumbing system configurations, you can download one of our manuals for details. As a rule of thumb in terms of water flow rates, you'll need at least 2L per min per 1m² effective aperture, but you can run up even 10L/min/m2 as long as it within pressure. Check to make sure your pump can supply the volume of water at the mounted pump height. Note: at 10L/min through 13mm poly pipe with a 50m length you'll get a pressure of 12psi which is really the limit we'd suggest.
The issue for independent type systems, is firstly, you're going to need separate suction and return ports in your pool, but the other more pressing issue is the fact that the smallest pool pump available is 0.33HP. (Don't use pumps that are not rated for chlorinated water - chlorinated water is harsh, if you use a pond pump the rotor will get eaten away quick, we'll be talking more about this in our materials section below.) Even with this smallest pump sizing though, we really recommend at least 15 x 50m 13mm coils connected in parallel where the 150L/min flow rate is split between the 15 coils so that you "only" have 10L/min for each coil and or about 12psi pressure which is a lot really. Using the effective aperture ratio, 15 tight packed coils is equivalent to say 15 x 0.65/1.1 = 8.7 OKU panels so this would be the smallest system we'd recommend for a 0.33HP pump. With OKU panels though instead of 12psi, the pressure in this case would be nearly zero as they are open channel inside.
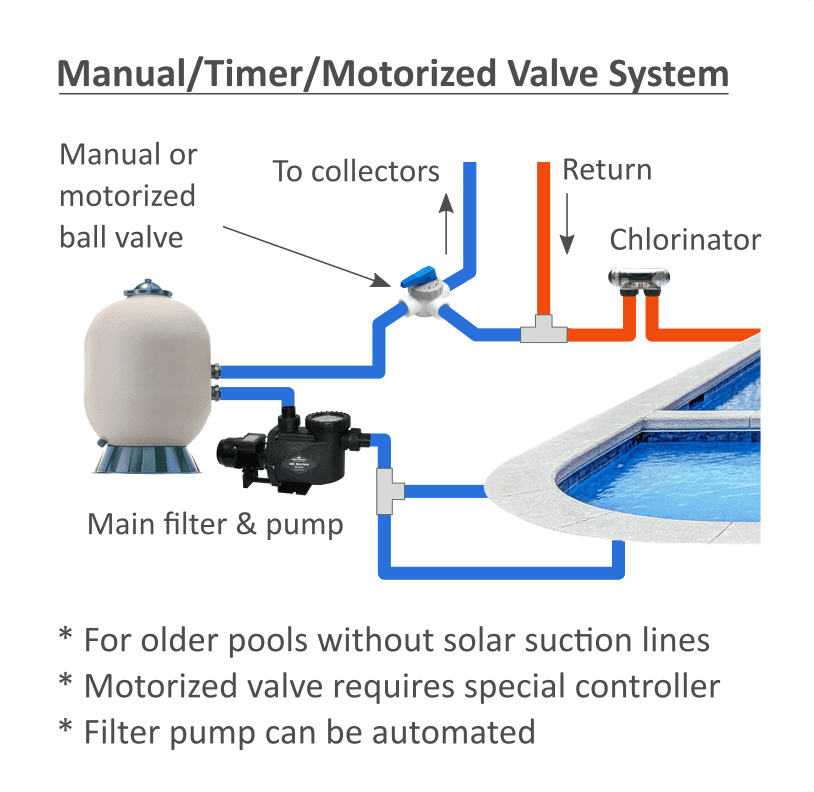
Manual Plumbing Configuration
This is actually the configuration we recommend for this setup. Not because it's our preferred setup, the independent system is our preferred configuration as that's what will give you a fully fledged poly tube style automatic system, that will rival a commercial system - if you size it right. The only reason why we think the manual setup is a better fit, is because it's in the spirit of a poly tube system, i.e. it's the least inexpensive option. For a manual system you don't need many or expensive extra components. You just need a 3-way ball valve to divert your flow and a non-return (with a 6mm hole for drain down, see manual). We recommend you put your pool pump on a timer and run the system from 11am-4pm say, in the warmest part of the day, if there is heavy cloud or the pool gets up to temperature you we'll need to stop the system. Not exactly automated but with a timer the bulk of the work is done.
6. What About a Solar PV Type Controller System
Apart from commercially available controllers, there are very simple solar based controllers that just rely on connecting a solar PV panel to a solar pump. The sun comes out and powers the PV panel which energises the pump during a time when the sun is out. When it clouds over the pump stops. We're experts in such systems with our Vertex Spa Heater. A couple of points for such systems. Firstly, you'll need an under-temperature snap action thermostat (we recommend 39°C as they typically have a minimum 10°C differential as a reset so they'll reset at 29°C) mounted in the solar panel junction box to make sure the pump won't come on during cold but sunny conditions as this may cool your pool water. Secondly, note that you can't connect any old 12V pump to a solar panel, as solar panels produce a broad range of voltages and currents, you really need a specific pump controller for the task. The pump should actually be 18V as that's the maximum peak voltage for a 12V nominal panel.
Note, such custom voltage solar pumps are expensive, hard to source, sometimes they are not rated for chlorinated water and sometimes are not self-priming so keep all that in mind if you want to set up this kind of system (see our Vertex manual for a description of such systems). It's very easy to airlock and/or dry run a non-self priming pump and burn it out.
7. Why You Need a Vacuum Release
This is a critical component for roof mounted systems. For ground-mounted coils, you won't need this but is always recommend depending on pump height measured from the waterline to the highest point on the collector. Basically, for roof mounted coils, once the water stops pumping it wants to fall back down and if you don't have a vacuum release on the return line the falling water will crush your hot tubes. In fact for poly coils it's also critical to have a vacuum release and non-return (with 6mm drain hole) on the supply side also, since air introduced from the vac release on the return line can't easily get to the supply side (due to a multiple of air locks in the coils). If negative pressure is not relieved when the pump stops, this will collapse the tubes leading to fatigue working of the polymer over a couple of years time and ultimately polymer failure. Once the first leak appears, the entire system will already be pressure worked, if this happens you can be sure other section of pipe are near fatigue worked also, and cannot be trusted on a roof. So these critical components should not be skimped on.
Ground Level and Below Water Level Installations
The main thing to consider for ground-level installs is the pressure because you don't have that pump head height reduction in pressure as for a roof mounted system. A ground level install could have high pressures flowing through it and poly tubes are going to be difficult to seal up properly over the long term. Any busts and you'll drain your pool and dry run your pump. So size the pump down. Again you'll need at least 2L per min per 1m² effective aperture, that kind flow corresponds to about 5.2L/min per 50m coil of loose spaced collector, which will produce a pressure of 3.8psi. Note: at 10L/min through 13mm poly pipe with a 50m length you'll get a pressure of 12psi which is really the limit.
Below water level installations are generally not recommended for pool heating systems. Three things to worry about here. Firstly, hot chlorinated water is going to be harsh on all the fittings during summer in stagnation mode. Unglazed collectors can get up to 75°C in full sun on a 35°C day. Next is the constant pressure, because all components are under the waterline they are going to be exposed to constant water pressure at 75°C in summer, which can be quite harsh on any polymer let alone LDPE or the fittings. Cylindrical HDPE piping could take this easily enough, but LDPE is not as strong being a softer material. Lastly, be mindful of the thermosyphon effect which kicks in at night to cool your pool for below water level mounted collectors. To stop this run a section of the return line above the water line and put a vacuum release on it above the water line or use a non-return valve.
8. How to Overcome and Check for Airlocking Issues
It may be tempting to choose the 25mm poly tube as it's cheaper and has lower friction losses right, and less work as the pipes are thicker. But if you use a larger bore pipe like that, you'll never clear all the air out of the loops, which means you'll have air pockets at the top of the pipe sections where the sun generally shines leading to an inefficient system.
Each diameter will have a minimum flow rate required to clear air pockets, and this will depend on the tilt of the coils, which is the other reason why we recommended low tilt angles. Basically you need to make sure you get sufficient flow to clear the airlocks for the 13mm line. From a simple experiment we found:
to get reliable air clearance in a 13mm loop line at 10° requires a minimum of 2L/min flow
19mm will require a much larger flow and 25 larger still. Larger tilts will require a larger minimum flow. If you don't want to follow our advice and use the 13mm line, that's fine, just connect a few circles of your diameter pipe to a tap, mount it at the tilt angle that you want to use and do a few flow experiments. To know when the airlocks are cleared do experiments in full sun and feel the downward loops for hot spots at the top if you can feel hot spots in the downward loops you need to increase the flow. Increase the flow until you don't feel any hot spots then measure the flow rate using a stopwatch and say a 1-2L bottle. Add a safety margin by multiplying by x1.5 to get a minimum flow rate required to clear air pockets. To get a total system flow rate at zero pump height, multiply by this flow rate by the total number of 50m coils you'll have, each coil will need this flow rate. Then make sure you choose a pump that can supply this flow rate at the pump height on the roof. Check the pump head/flow chart on the pump.
Unlike with minimum flows, there really is no maximum flow from a thermodynamic efficiency prospective; the more flow the better. Anything past 10L/min/m2 is of diminishing return in terms of collector efficiency. For higher flow rate you'd need to consider pressure and energy usage.
9. What System Components to Use - Which Materials Withstand Chlorinated Water
So terms of chlorinated (or bromide) water resistance, LDPE is very good. Polypropylene (PP) fittings, commonly used with such irrigation hoses, is not so resistant, alas but not terrible... Nylon glass fittings are flat out incompatible. Polypropylene can be used but care must be taken to make sure pool water pH stays above 7.5. From our experiments here, pH was one of the most determining factors in degrading polymers. The most compatible material is of course PVC, and should be used for plumbing critical plumbing lengths. Brass can be used although it's not that compatible with acidic chlorinated water, however, if the pH is kept about 7.5 it shouldn't be an issue.
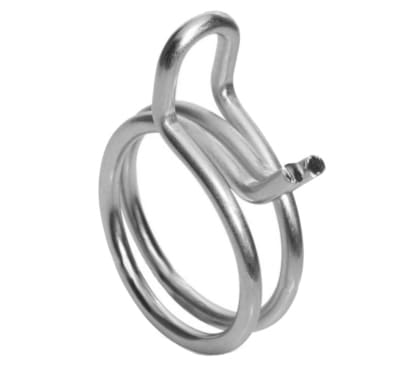
One issue you're going to face here is how to seal the LDPE pipe properly onto the barb fitting that you want to use. I wish we had a solution for you unfortunately we do not, apart from suggesting to use Teflon tape and silicon grease and use a spring clamp which will grip the outer diameter evenly as opposed to an irrigation ratchet clamp. Mind you do not over clamp any plastic barb as they will shrink in diameter over time; PP irrigation fittings are made pretty thin. We'd probably suggest you use brass barb fittings if leaking is an issue, up on a roof for example. Chlorinated water will corrode metal roofs and gutters.
Warning on pumps that are not fit for use with chlorinated water, their rotors and inner casings may degrade quickly, again depending on pH and chlorine concentration. Check with the pump manufacturer.
10. Myths and Misconceptions
Lastly, in this section we'd like to talk about the common myths and misconceptions people have in this area:
Slowing Flow Gives Hot Water so it Must Increase Efficiency Right?
Wrong - making the collector work at higher temperatures will bleed more heat from the collectors surface into space. Sure the water will come out hot, but it'll be a trickle. You'll get more energy and hence a better overall temperature boost in your swimming pool if you run the collectors at a decent clip so that all the heat is stripped from the pipes and goes into the water.
Clear Plastic or Glass Cover Will Increase Efficiency
Nope - this may be the case for hot water collectors, but for pool collectors where the pool water is about the same or typically lower than the roof temperature, such glazing insulation will actually prevent warm roof air from transferring to the pipes, but secondly about 10-15% of sunlight is reflected back into space by the surface of any glazing material. So you lose that much straight off the bat and then there are the potential overheating issues. Keep it simple don't glaze it, you'll get a better result.
Painting the Gaps Between the Tube Black for Better Heating
Sorry - believe it or not painting the base the tubes are sitting on mat black has zero effect on increasing efficiency in most cases, because it doesn't matter if visible light photons are scattered from the base surface onto the pipes (for a light colored surface), or if invisible infrared photons are scattered from a hot black painted surface. Both will result in the same flux of scattered radiation on to the pipes. In fact if the mounting surface is a heat sink like concrete, then painting it black will actually produce a worse result than keeping it white, as the heat will go into the concrete instead of scattering back out onto the pipes if it was white. In fact, in high wind a hot black painted base may lose more energy than a white base, since wind air in contact with the black surface will strip the heat off.
If on the other had the backing material was made of a conducting metal and had good thermal transfer to the water in pipe then yes a black base surface will help. It's all about - the best way of channeling ALL the heat from the sun into the pipe and into the water.
Summary
So there you have it, you can actually build a semi-decent, fully fledged pool heating system out of 13mm poly pipe at a fraction of the cost of a commercial system if you follow these tips and most importantly size it right! It will take a lot of area mind you, but if you have the room for it, it's not a bad way to go :)
If you enjoy this article please share, it'll help us get the word out about solar and renewables if you have built one recently; - let's help stop people from wasting their time with a little knowledge.
I for one would love to see a picture of a fully fledged 167% coverage poly tube system on a small 0.3HP pump with a controller.
If you enjoyed this article please share, it'll help us get the word out about solar and renewables :)

